This watermelon jelly takes the fresh, sweet flavor of high summer and concentrates it into a spreadable preserve that has the power to transport on a cold, February morning. It’s always a winner with watermelon-loving kids!
When I think of fruits that are good for preserving, watermelon is not one that immediately springs to mind. Truly, it’s not something I would have even considered putting in my jam pot, had it not been for a request from an old friend, Stef from Cupcake Project.
She was trying to find a way to make a watermelon cupcake that tasted fully of the melon, without resorting to an additives not found in nature. One of her readers suggested using a watermelon jelly, and so she made a request of me. Would I be up for trying to create one that she could use in a cake?

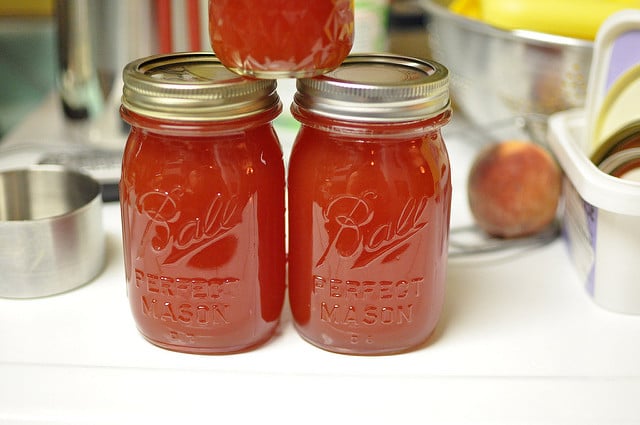
I’m always up for a challenge and so took a stab. During the cooking, I was racked with anxieties, as the watermelon juice took on a slightly strange scent once hot (a little like cooking pumpkin). I used pectin and took the syrup all the way up to 220 degrees, in the hopes of getting a good, jellied set.
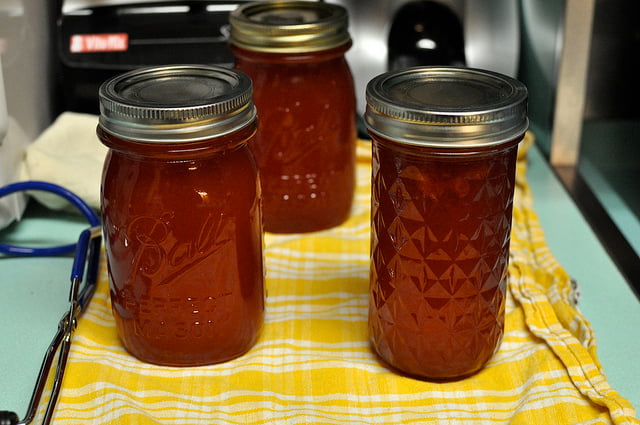
Only when I checked the jars the morning after canning, the watermelon jelly hadn’t set solidly. The contents were thick, but still loose. I sighed and tucked the jars away, figuring I’d need to try again. However, before I managed to make another batch, I returned to the first set of jars and discovered that while they’d been sitting, the pectin had activated and they’d jelled perfectly. Upon tasting, I was happy to find that jelly was spreadable, sweet, tart and deeply watermelon-y.
Things to know before you start making watermelon jelly
Watermelon is lower in acid than other fruits that we use to make jelly. Because of that, this recipe employs a hefty measure of bottled lemon juice to ensure that the finished product is safe for canning. I use bottled lemon juice rather than fresh because it has a consistent and reliable acid content. Fresh lemon juice can be far more variable and so should only be used for adjusting flavor, not for ensuring safe pH levels.
This jelly needs to boil vigorously for an extended period of time to achieve a thick, spreadable consistency. If you have an outdoor cooking set-up, I suggest considering doing this extended boiling session there rather than in your kitchen. It will keep all that moisture out of your house and will keep things cooler inside.
Make sure that you check for set before removing the jelly from the stove. I like to watch the temperature and use the plate test. For more on set, read this post.
If you’re looking for a watermelon jelly recipe that is lower in sugar than this one, check out the one from Pomona’s Pectin.
Fresh Watermelon Jelly
Ingredients
- 5 cups white sugar
- 6 tablespoons powdered pectin (if you have a box, use the entire packet)
- 6 cups pureed watermelon remove any seeds prior to pureeing
- 3/4 cup bottled lemon juice
Instructions
- Prepare a large canning pot and enough jars to hold five half pints of finished jelly. Wash new lids and set them aside long with five rings.
- Whisk together sugar and powdered pectin until they are fully integrated. Combine watermelon puree, sugar/pectin and lemon juice in a large, non-reactive pot.
- Bring the watermelon mixture to a boil and let cook until the temperature of the liquid reaches 220 degrees. This can take anywhere from 15-30 minutes, depending on the width of your pot, the heat of your stove and even the weather you’re having. Check set using saucer test before removing it from the heat, to ensure that it will set.
- Remove from the heat and pour into prepared jars. Wipe rims, apply lids and screw on rings. Process in a boiling water canner for 10 minutes.
- When time is up, remove from canner and let jars cool. When they’re cool enough to handle, remove rings and test seals. You can eat immediately or store unopened jars in a cool, dark place for up to a year.

Can this recipe be used to make freezer jelly? I dont have a canning pot nor cabinet space.
Yes. Proceed as written and pour into freezer containers at the end of cooking. If you’re going to freeze in plastic, let the jelly cool for a little while before filling the containers.
Can I add a habanero pepper to this recipe? Not enough to set my mouth on fire.Just add a little zip. Do I need to make any sugar adjustments?
I wouldn’t with this recipe. Watermelon already needs a lot of acid to ensure it is safe for canning and adding hot peppers could pull the acid levels into an unsafe zone.
Thank you for the recipe and easy instructions.
You’re welcome!
I have not made the watermelon jelly but I have some I want to make I do not have any powdered pectin on hand I do have liquid sure Jill pectin Will that work the same way? Mix with the sugar and the lemon juice and then the wm juice?
Liquid pectin doesn’t work particularly well these days. You can try it, but I find that powdered is a much better product for producing a firm set.
I love your recipe, I well try it tomorrow with a sugar baby watermellon
I will definitely be trying to make watermelon jelly. I don’t believe it should quite need that much sugar, as watermelon is naturally sweet.
If you want to make watermelon jelly with less sugar, look into a low sugar pectin. This recipe relies on the sugar to help create the set. If you reduce the sugar, you may end up with syrup rather than jelly.
Can this be made, but put in the freezer instead of canned?
Yes.
Love this recipe and I also get >10 half pints.
So glad it works for you!
You elsewhere strongly recommend using Ball pectin (rather than SureJell), but this recipe has the sugar and pectin combined up-front, and Ball says to add the pectin to the juice, bring to a boil, and only then add the sugar (or the pectin won’t work, according to many recipes).
I made this recipe using the Ball style ordering, and it turned out quite well, and jelled immediately. Note though that I’d reduced the watermelon juice already some. I also found that increasing from 3/4 cup to 1 cup of lemon juice matched the flavor profile I was looking for better.
Is that just because the recipe is old and was developed using a different product?
Yes, it was developed a long time ago. I’ve tried to tweak it over the years to make it work best with what’s available, but it really needs to go back to the drawing board for a redo. Next summer hopefully!
Delicious 😋
So glad you like it!
if you start with 5 3/4 cups fluid and sugar you will get more than 5 3/4 cups fluid.
The volume reduces a great deal during the cooking process.
Mine has not set can I reprocess it? Do I add more pectin ?
https://foodinjars.com/blog/jam-didnt-set-what-to-do/
I over boiled mine and it is real watery. I used pectin in yellow box Should I have used the one in pink can I reboot it?
https://foodinjars.com/blog/jam-didnt-set-what-to-do/
I tried this twice. Both time it never set up. And I got 10 half pints out of it.
I ended up having to do it again and as an extra package of pectin to get it to set. Made 7 half pint jars. Very pretty color. Not sure if I’m crazy about watermelon jam but my stepson asked for it.
I’m glad you were able to get it to set for you! It’s definitely a finicky one!
How much does this make? I did not read it in tbe article.
It makes approximately 5 half pints. I’ve corrected that error in the recipe.
Just finished w-Mellon pickles & have 1-pint liquid left. Can I take & purée the melon & strain it, mix the pint-strained add Sure-gell as per directions. Will it set up? I am loving the flavor of the syrup. Don’t want to throw it out.
I’m so sorry, but I have no idea how that would work.
Actually it’s
40+48+4=92
92÷8=11.5 8oz jars
I believe the reason she’s off is volume
5 cups of sugar
6 cups of juice
1/2 cup of lemon juice
40+48+1/2=98..5 ounces
98.5÷8=12.3 Half pints
I followed the recipe to the letter and mine made 12 1/2 pints. I used a combination of Black Diamond and Crimson Sweet watermelons simply because I grow 4 varieties. It’s by far and leaps and bounds the best tasting juice I’ve ever produced! Waiting for it to set up. I do agree with Mari Hanson with one exception. Mine made 12 1/2 pints and I have no explanation as to why and I’m not going to complain one bit!!! It’s delicious 😋😋😋😋 I traditionally make wild sand plum jelly here in Oklahoma also. Probably not anymore however because this is much better. I combined sweet ripe melons with those a little less ripe. FANTASTIC!!!
That’s a huge yield, but as long as you’re pleased, all is well!
This jelly (and our dehydrator) kept me from being totally overwhelmed by gigantic watermelon last year. I made several batches – some with agave nectar using the recipe in your book and some following this recipe. Our preference turned out to be watermelon with lime and sugar.
I’ve been using the jelly made with agave nectar along with dehydrated watermelon to make your jammy granola – great layered with vanilla Greek yogurt. We’ve enjoyed both types warmed up to use a syrup over pancakes. But for jelly on toast, nothing beats the version made with sugar.
We’re growing smaller watermelon this year and I’m looking forward to making more jelly. It’s an unexpected taste of summer in the middle of winter that has everyone begging for more!
So, caveat here, I tried to double the recipe since we had a monster watermelon to use up, and ran into multiple problems. 1) it boiled over really bad in my 3 gallon stock pot. I transferred it to my largest pan – my waterbath canner pan – and it just wouldn’t get up to 220 even after an hour of boiling it. I’m sure I lost a LOT of volume doing it that way, so my measurements likely were way off by this point, but I couldn’t go back. So, in order to get it to reach 22 I divided the mixture in half, to cook it in two batches in my stainless steel pot that cooks hotter. It worked, in just a few minutes I had it up to temp. I had read so many comments on multiple versions of this recipe about people’s recipe turning to syrup so I got worried and cooked it longer. This was a mistake! I’m fairly certain what I scooped into the jars will be watermelon candy. I hope we can get it back out of the jars again after it cools. The second batch I did not cook extra, I only cooked it the 5 minutes, and it is beautiful. I’m pretty sure it will set up as proper jelly. Moral of the story here is don’t underestimate the size of your pan!
You never want to double a recipe like this one. That’s where your trouble started.
I used sure jell and it worked great. Love the new idea for watermelon jelly.
Hooray!
The jelly came out great! Once I got it to 220 I kept it there for 5 minutes. It was set the next day with the perfect texture. I took out any seeds I found before adding to the blender and then put it through a mesh strainer in case there were any seed fragments so it was nice and smooth. I make a lot of cakes and use my jams as filling between layers, this will be good with a white cake and cream cheese frosting for a taste of Summer! Thanks for the recipe!
I’m so happy to hear that it worked so well for you!
My grandmother would cook down the watermelon, add sugar, and then I believe would strain the liquid with cheesecloth to remove the seeds. It wasn’t jelly-would put it on kuchen (coffee cake).
lost my recipe book . Just trying to find a new one
I believe in your reply about making so many half pints you may have misworded. In the recipe it says yields 5 HALF pints. But in that reply you use just pints. This recipe yielded 10 half pints or 5 pints.
This recipe makes a little over five cups of finished product. I canned it in two pint jars and one 12 ounce jar, but it can be canned in pints, 12 ouncers, half pints, or quarter pints. You will not get ten half pints from this recipe.
What applications do you suggest besides the cake?
Really, anywhere you’d like a jelly. Toast. Whisked into sparkling water. As part of a vinaigrette.
If I don’t have half-pint jars, do I have to change the processing time to use pint jars?
The processing time is the same for pints and half pints. It only increases if you go to a bigger jar than a pint.
Has anyone tried adding salt? I hear it is a southern USA preference.
Only thing i would add is the yield is WAY off. It says 5 – 1/2 pints and my batch made 10 – 1/2 pints. Don’t know if this is a typo for 5 pints instead or what, but i had to scramble to clean 3 more jars (I usually prep a couple extra every batch).
I don’t understand how you yielded so much. There’s not even enough starting ingredients to yield 10 pints.
Is there any way of using less sugar? Watermelon is already sweet, is there another fruit that could be used?
It will not set up with less sugar.
How do I puree to get the juice and can I use sure jell
You puree watermelon in a blender. And I don’t recommend Surejell. Ball pectins are more reliable.
What could have happened to make the jelly smell fishy?
I’m not sure how that would happen!
What brand of pectin did you use??
I used Ball brand powdered fruit pectin.
Hey Marisa,
I’m super excited to try this recipe out!! We have SO MUCH watermelon where I live, at this time of year, and this jelly looks amazing – not to mention those cupcakes! Quick question, though – you say to remove seeds. Do you just mean the black seeds? Are the white ones alright to leave in?
Thanks so much!
I typically try to get the bigger white seeds out of the watermelon, but a few are okay.