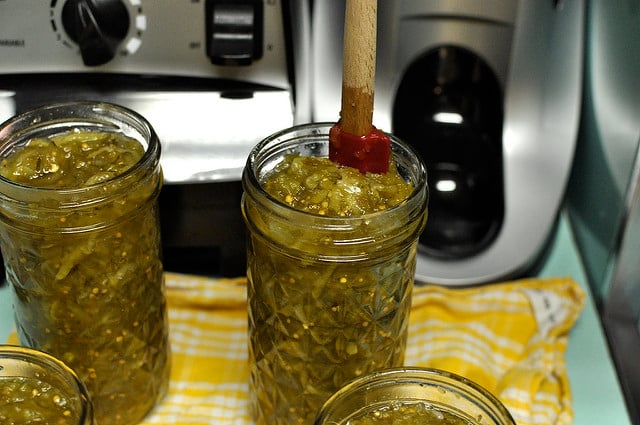
Often, when you read a recipe for pickled vegetables, chutneys, relishes or whole fruit preserved in a syrup solution, you’ll come across a phrase that says something along the lines of, “bubble your jars thoroughly.” For new canners, this is often a confusing statement. What exactly is the recipe asking you to do and why do you need to do it?
When a recipe instructs you to bubble your jars, it is telling you to take either a plastic or wooden utensil (I really like that long, skinny spatula you see in the picture above. However, a wooden chopstick or a plastic knife work well too) and insert it into your jar. You use that utensil to wiggle your product around in order to release any trapped air bubbles. You do this after you’ve packed your jars and topped them with your brine or syrup (or after a chunky sauce/chutney/relish has been ladled in).
The reason you want to choose a tool that is made of either plastic or wood is that they will not scratch up the insides of your jars. Metal utensils can leave very small scars behind that end up shortening the lifespan of your jars. When working with glass, it’s always a good idea to do what you can to prevent breakage. This is one of those things.
The reason it’s important to rid your jars of trapped air is that in canning, the empty space to product ratio needs to balanced carefully. You need to have enough air in the jar so that after processing, the escaping heat can pull the oxygen out of the jar and create the vacuum seal. However, too much air and you find that some of your product is left sticking out of the preserving liquid, leaving it prone to discoloration and the development of off-flavors.
Additionally, if you leave those air bubbles trapped somewhere in the middle of the jar, they may try to escape during processing and can end up pushing some of your liquid out of the jar, leaving you with even less of your precious brine or syrup.
If you’ve had that loss of liquid happen to you in a previous canning attempt, don’t despair! As long as the seal is good and firm, the contents of the jar are still fine. You will want to move them up to the front of the consumption queue though, as they will not keep as long.

I made pickled garlic and a couple jars had foamy bubbles at the top after a few days of sitting …. Is that normal ? I’ve already done 30 jars before these and the only change to the recipe I made was apple cider vinigar instead of white
Hmm. That’s not normal. Is there activity in the jars? Do they look like they are developing active bubbles? It sounds like it could be fermenting.
Why when i bottles fruits it bubbling
The canning medium is boiling as a result of the boiling water bath process. It’s totally normal.
I just jarred picked red onions and removed the air bubbles. After the water bath the onions floated to the top and there is a large amount of liquid in the bottom of jar. Is this shelf stable still?
If you raw packed the onions, that’s pretty normal. As long as the jars are sealed, they are safe.