Looking for the right canning equipment to get you started? Here are my favorite tools to prep, cook, and process my preserves.

When I started canning, I didn’t have any gear that was designed for the job at hand. Instead, I made it work with what I had already in my kitchen. These days, I do have quite a lot of dedicated canning equipment, but I will always be the first to tell you to shop what you have before you buy a purpose built tool. Here are the general categories of gear you need!

A Canning Pot
Stop! Don’t run out and buy a speckled enamel canner. The are flimsy and won’t last more than a couple seasons of use. All you need to process your jars is a pot that is tall enough to hold a rack, your jars, an inch of water above the jars and an additional inch or so of space where the water can boil.
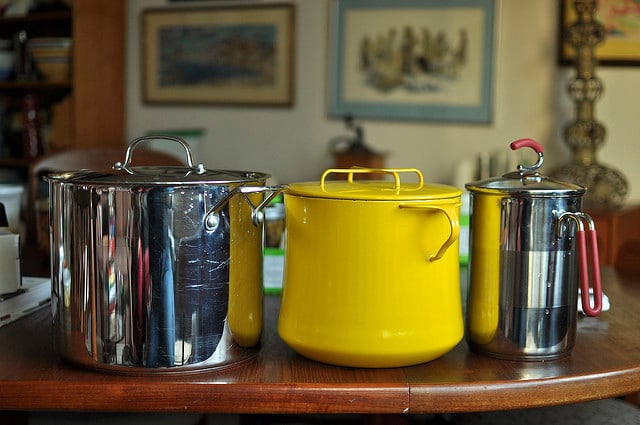
Most often, I use this 12 quart stock pot made by Cuisinart (in the picture above, it’s the one on the left). For batches that only make three or four jars, I use the yellow stock pot in the middle of the photo (made by Dansk, that one was an eBay find). And for when I only have two or three half pints to process, I use a 4th burner pot
.

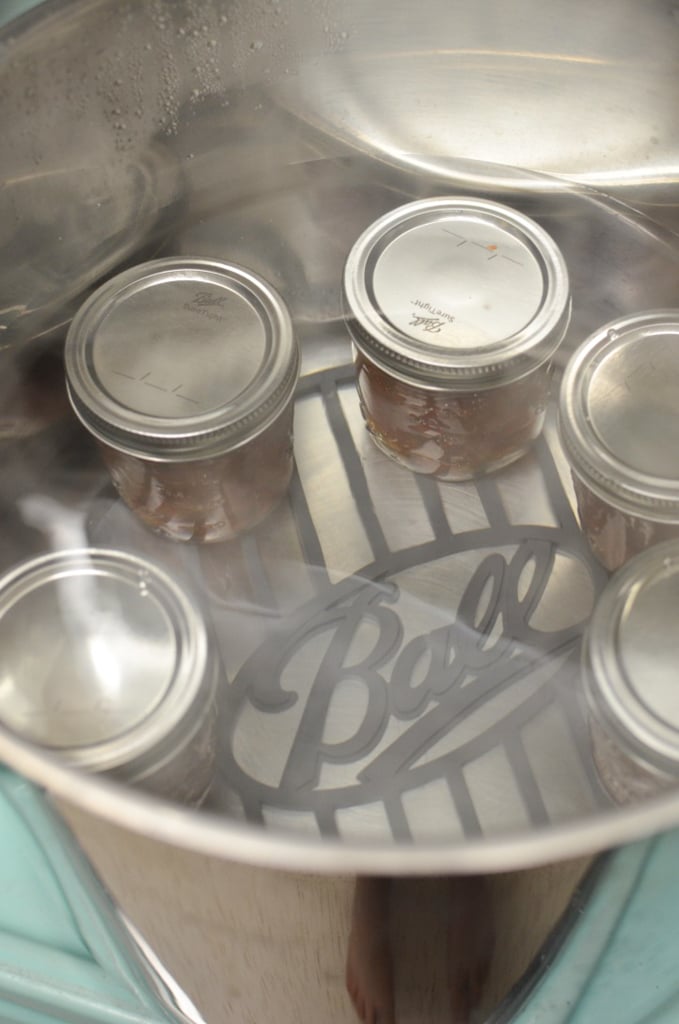
Any time you turn a stock pot into a canning pot, you need to find a small rack to drop into the bottom. I’ve used round cake cooling racks, kitchen towels, a layer of old canning jar rings, dedicated racks like this one from Progressive International (it’s quite good). These days, my very favorite rack is the silicone one that Ball includes in their starter kit. It fits most stock pots perfectly.
Obviously, you don’t need to have all three of these pots when you’re starting out. The idea is simply to show that nearly any tall pot can serve as a canner and that if you’re only canning a few jars, you can use a smaller pot, should you have one in your kitchen arsenal.

Cookware
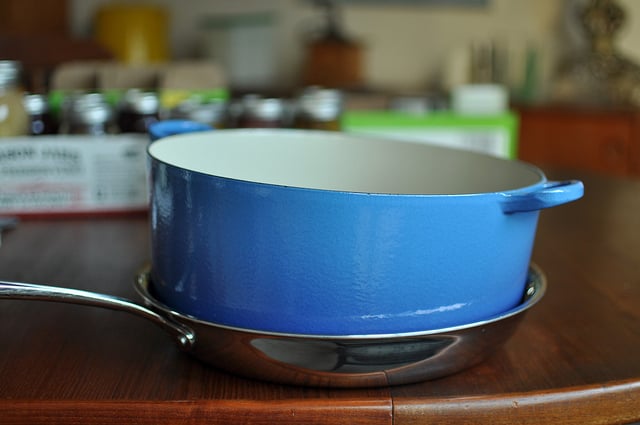
Once you have your canning pot figured out, you need a pot in which to cook your product. For jams, jellies, tomato products, chutneys, and other products that need to be cooked down, I typically opt for a roomy Dutch oven. I really like the my nine quart Le Creuset that’s pictured above because it is low, wide and nonreactive to acidic ingredients.
I also regularly use an 8 quart stainless steel All-Clad Dutch oven, particularly when I’m cooking something that I know has a tendency to burn (my tomato jam springs to mind). You can always scrub a burnt spot off stainless steel. It’s harder to do without ruining the finish on an enameled pan. Another good option is the Sur La Table 8 quart pan to the set of cookware I take to canning classes and I like it. It’s not quite as low and wide as the All-Clad model (a plus when trying to encourage evaporation), but it goes on sale a couple times a year and when it does, the price is excellent.

A maslin pan is a good option if you do want to invest in a dedicated preserving pan. It has yield measurements up the side, which helps you judge how many jars you’ll need for the finished product.
I also use a stainless steel skillet for a lot of my very small batches. Because these small batches quickly over very high heat, you want something that will perform well under those conditions and I’ve found that any heavy, low, wide stainless skillet will do.
For heating pickle brines, I always turn to the 4th burner pot pictured above. Because it’s got both the spout and the handle, it makes it a breeze to pour the brine into the jars.

Other Canning Equipment
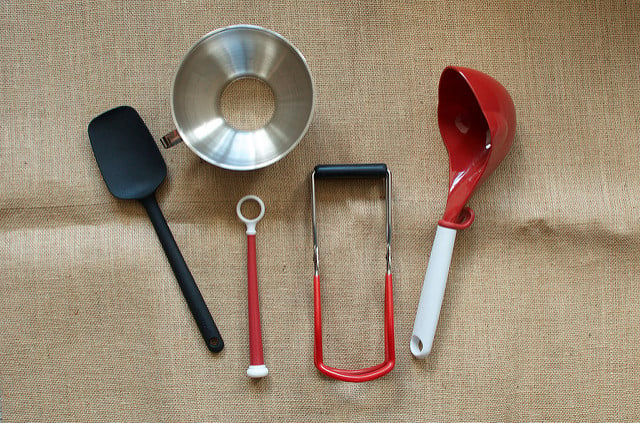
Finally, we come to the small tools. You’ll need a knife and a cutting board, but I figure most of you have those, so they’re not pictured here. A heatproof tool for stirring and scraping is necessary and I prefer silicone. I like the spoonulas made by Mastrad and by GIR.
A wide mouth funnel is always useful for getting your products into jars without a huge mess. I like the stainless steel ones just a little bit better than the plastic, but use both regularly. A jar lifter is a handy tool to have and I’ve found that the one made by Progressive International
is my favorite (it’s got a stronger magnet than most, which makes retrieving lids a bit easier).

Jar lifters are designed to give you a secure grip on the jars as you move them in and out of the water. Though the jar lifter has been redesigned repeatedly over the last few years, I find that I still like the classic model the best (even if the rubber on the grips does have a tendency to peel away over time).
Finally, you want a good tool to move your product from the pot and into the jars. For years, I used an 8-ounce measuring cup to do this job (since it’s the same size as a half pint, you knew that with each scoop, you were getting enough to fill a jar). But these days, I’m totally loyal to the silicone ladle made by GIR. It is sturdy, flexible and also holds 1 cup, allowing you to get a perfect portion for standard sized jars.

Other tools that I like.
- Potato mashers! They help break down large chunks without pureeing like an immersion blender does. I like this one
and this one
(that second one is actually a pastry blender, but they don’t make the potato masher version any more. The pastry blender version is great for small batches of jam, though).
- Skinny silicone spatulas!
They are the perfect tool for easing air bubbles out of pickles and whole canned fruit because they can slip in without doing a lot of damage.
- Paper towels or washable kitchen cloths. I use these for wiping jar rims, cleaning up spills, and generally controlling the mess of canning.
As you’ve read through this post, you’ve probably noticed that a number of the things I call for are items that already exist in your kitchen. And if you don’t have exactly what I’m recommending, chances are you have something similar. Truly, it’s a kitchen task that many are already equipped to do.
Finally, remember that this post details just my opinions. You may have or discover favorites that aren’t mentioned here anywhere. Such is the way of life.

Just curious if you have a preferred ph tester?
Here’s the one I’ve used in the past: https://www.thermoworks.com/high-accuracy-ph-meter-8689/
can every food canned?
Not all foods can be canned. It’s important to consult a reference site like the National Center for Home Food Preservation before trying to can something.
This is amazing! I do have a question though. I have an enchilada sauce recipe that I use multiple times a month, and making it from scratch every time is just becoming more of nuisance than anything. I want to can it, but it’s not a canning recipe. How do I can it safely? Completely newbie when it comes to canning.
It really depends on the enchilada sauce recipe, as to whether it can be safely canned or now. Here are some versions that are safe for canning. https://www.sbcanning.com/2012/04/enchilada-sauce-in-jars.html
QQ: I got that silicone trivet on your rec for smaller canning situations, but it just floats up constantly. Do you have a secret trick to keep it down until you’re ready to put jars on top?
I either turn off the heat or pull the canning pot off the hot water, then flatten the trivet back out with my jar lifters. It’s the vigorous boil that makes it fold up. Because of the way my stove is designed, I always have to pull my canner off the hot burner in order to load jars in and out, so I never knew that it was an issue until people started bringing it to my attention.
Hi Marisa,
Thanks so much for this post as well as, your whole site and blog. I am new to canning, and I have found your posts so helpful. I’m learning a lot. I’ve also made several of your jam recipes and they are delicious! I enjoy making small batch jams because it allows me to try lots of flavors without jars taking over my pantry. I prefer to put jam in the quarter pint (4oz.) Ball jars, so I have plenty of gift-sized jars to share with family and friends. And that way, I can give them a few flavors without overwhelming then with my latest obsession. 😉
A question for you– Do you have a recommendation for a great 12-quart stainless steel stock pot with a vented, tempered glass lid? I really like the Cuisinart pot you recommend, but I prefer vented glass lids, so I can monitor the boiling. You know what they say, “a watched pot never boils”. However, I have a tough time telling when the pot reaches a full rolling boil without seeing it, and I want to get the processing times correct. Right now I’m using a Le Creuset stock pot with a T-Fal vented, glass lid from another shorter pot. It works, but I don’t want to continue subjecting the enameled pot to water bath processing. Thanks, in advance, for your advice. I really appreciate the wealth of knowledge you share with your readers.
I don’t have any personal experience with this pot, but if I was in the market for a new one, I’d buy it. I like the fact that it is induction compatible. You just never know when you’ll be confronted with an induction cooktop! https://amzn.to/3lFIBfY
It’s good to know that jar lifters can help you get a more secure grip on your jars while canning. My wife wants to start canning to start stocking up on food storage. I’ll pass this information along to her so that she can successfully make processed foods for easy storage.
I didn’t know that you all you need is a pot tall enough to hold a rack, jars, and an inch of water above for canning, rather than a dedicated canning pot. My mom is looking to start a big canning project, and it is going to require quite a bit of work with how much she is hoping to produce. Perhaps we should look into an angelus seamer with how much canning there is to do.
I purchased the silicone trivet you use, but it always floats up to the top of the pot before I can get the jars in. Do you have any tricks to share? Thank you!!
I live in a very, very small house and have little room to store all the nice equipment my grandmothers have. I used the suggestion of just using the largest pot you have to start out and it WORKS. Mind I can only fit one jelly size jar in the thing, but it did safely seal and everything. Now I’m excited and know I enjoy the hobby and can buy something larger. Thank you so much for this post.
what is that star thing at the bottom of your pan?
That is the silicone trivet mentioned in this post. It’s what I use as a canning rack.
Hi, Marissa.
I am so thrilled to have found your site! I’ve been struggling along doing small batch canning in my very urban kitchen (i.e. very small NYC kitchen) for ages and frequently feeling a little sheepish when people would ask me “why are you going through so much trouble for just a jar or two?” (“Um, because it’s really very satisfying, some how?”)
I do have a question, if you please: I really like the idea of the 4th burner pot and am considering getting one. I’ve also lately been obsessed with the Weck 7.4 fl oz jelly jars. How many of them could I safely process in the 4th burner pot at a time?
Thanks for any help and the great site!
Holly, it doesn’t look like the 7.4 ounce jars would stack well in the 4th burner pot. It’s really only good for wide mouth half pints and Collection Elite half pints. The jars need to be low and wide to fit into it well.
Thank you so much for answering.
I guess I’ll just have to wait on the pot until I get back to the regular jars. (My wallet thanks you, too!)
Thank you so much for the great tips. I have a container garden and I always seem to get more vegetables than I can eat. Hate always having to give things away. Now I can them and not have to worry. I have large stockpots that will work, Now just need to get a jar lifter!!
Is there any reason I couldn’t use the strainer insert that came with my large stockpot instead of a trivet? It’s deep enough to submerge the jars and then some, and would make for easy jar removal …? Thoughts?
No reason at all. Go for it!
Wondering if you can answer a question. I made several batches of jam and processed in a bwb, but somehow forgot I needed an inch+ of water over the jars. Apparently I got a little cocky, thought I remembered how to can, and didn’t look at my instructions. Argh. Anyway, I know the jars were completely covered w/ water, just cannot guarantee it was an inch or more. Do I need to toss the jam? Thanks!
As long as they were covered, they are fine. The recommendations call for an inch of water to ensure that the water level doesn’t drop and leave the jars uncovered during processing. But for short times, all you need to ensure is that the were submerged.
Thank you so much! It’s helpful to know the reasoning behind the depth of water above the jars.
Its also worth noting that if you’re concerned about the processing of any jam you can just treat is like refrigerator jam – no need to toss it out
If its too large a batch to finish in a reasonable space in time, I’ve found jams/butters/jellies generally are fine to reprocess. I havent tried it with pickling but I imagine you might end up with texture problems there
Thanks you for the VERY informative piece! I can’t wait to make my first canned blackberry jam…hopefully the start of many canned items. I am going to do my boiling in the enamel canner pot over the extra burner on the outdoor grill and keep the heat outside. I have a glass topped stove so it won’t fit and could break the top. I am still imagining the logistics of doing this…ha! I do have to add: why the disclaimer about shopping at Walmart…why do you feel guilty about saving money at a great store??
THIS is what I was searching your blog for! Yay! Can’t wait to start this weekend. Hopefully, by the time my grandpop’s garden is overrun with Jersey tomatoes (they are really running late this year), I will be able to know enough to can them! (And, thinking of taking your tomato canning class at RTM!)
-Erin
Hi Marissa
Thank you so much for this post. I am new to canning and so this information is a great help. I am wondering if you could include some information regarding liquid pectin versus powdered pectin and if they two can be interchanged. Thanks!
I use my blossom all the time…..just picked up a narrow & tall agate canner at an antique shop for $6 …no rack…but like the blossom so much better! 🙂
I have been wanting to make tea flavored jams! Thanks for the post. I look forward to your series.
You know, I just finally got around to buying that blossom trivet! Such a joy to use when I had only 6 1/2 pint jars to can!
Hi! I’m new to canning this year and have successfully canned some rhubarb jam and mulberries so far. We have a lot of orange tomatoes and I’m wondering if I can hot water bath can a sauce made with them? Thanks!
All tomatoes, no matter the color, are canned the same way. Just make sure to follow a sauce recipe designed for boiling water bath canning and you’ll be fine.
Love the tip about using a silicone trivet! I have a huge canning pot that I bought a few years ago when I started and honestly it’s way too big for the small canning batches I make. I’m going to try the trivet inside a regular stock pot soon! Also, I’m not sure if your email subscriptions are working correctly. I’ve subscribed and checked my spam folder and new posts are not coming in. I’ve even tried re-subscribing and it tells me that my email is already subscribed.
Kara, there are two things you can subscribe to by email. There’s a newsletter which comes fairly infrequently, and there’s the email subscription to blog posts. My best guess is that you’ve signed up to the newsletter and not to the daily email subscription.
I think I read somewhere that your canning pot should have a flat bottom unless you use a gas burner. I used to can in a non-flat-bottom pot when I had a gas stove.
Alison, it is true. For one thing, cookware needs to be in contact with the element on an electric or induction range in order to heat effectively. Additionally, a pot with a concave bottom runs the risk of forming a seal with a flat top stove if water is involved. If that happens, it can crack the surface.
I have a question about the thermometer you use for making jams. I made a batch a few weeks ago and my therm that clips to the side of the pot didn’t work so well (plus it scratched the bottom of my pan!). So, I got a new digital thermometer that looks similar to one in a picture you put in a jam-making post, but I’m not sure it will work. My concern is if the metal thermometer/temperature gauge sits on the bottom of the pan then it will register a temperature hotter than the actual jam. Is that OK or do you have a better suggestion or a specific kind of thermometer that you love to use? Thanks!
Thanks for posting this! I am still new to canning and this straightforward tutorial is really helpful. I look forward to reading more.
I just ordered a silicone trivet! I have a blue speckled canning pot with a great rack, but it’s really too big for my electric burners and doesn’t sit right on on them. I’m going to try the silicone trivet in a large stock pot instead. Thanks for the equipment review!
I’m going to see if I can make it to your class here in Portland. It’s right up the street from me!
When you process two half-pint jars in your fourth-burner pot, do you stack them?
I do!
Hi. If you stack them do you need to put some something in between to divide them so they don’t touch? Thanks!
I typically use a rigid round cake cooling rack to divide the layers. It’s not technically necessary, but it makes for a more stable arrangement.
Thanks for this really useful information! I’ll have to track down one of those silicone trivets – they look fantastic.
What’s the brand of the cookware at walmart? The link isn’t working for me…
thank you!
Tramontina
The brand is Tramontina and the line I like is the clad tri-ply stainless steel.
I’m not new to canning and I still got some great tips from this article! Thanks for sharing. The silicone trivet idea is amazing!
After being frustrated one too many times by the riduculously weak magnet on my lid-lifter, it finally occurred to me that I had a telescoping magnet “wand” in my toolbox just collecting dust (they are used for things like fishing out dropped screws from heating vents and such. Ask me how I know this!). It is perfect for canning because the magnet is super strong and the wand is adjustable to exactly the length you need it to be to fish around in your pot (so no hot steamy fingers). Just be sure to wipe it dry after use so it doesn’t rust.
Mine is somewhat similar to this one from Amazon, but any hardware or home center will carry them:
http://www.amazon.com/25016-Telescoping-Magnetic-Pocket-Pick-Up/dp/B000CMHK9U/ref=sr_1_5?s=hi&ie=UTF8&qid=1373058871&sr=1-5&keywords=telescoping+magnet
Thanks for such a great post! It’s just what I needed. I’ve been sticking to simple refrigerator jams and pickles because I didn’t have the equipment for a water bath and didn’t know where to start.
I love my Kilner Jam pot and Victoria Steamer/Water Bath. I started preserving last year and just love these new additions to my canning set up.
Great post! I’m not brand new to canning, but I’ve been canning on a shoestring kitchen for a few years now. I added several of these tools to my amazon wishlist so that canning will be easier in the future. Thanks!!
After surviving blackberry season in a pot I salvaged from our machine shop that was half full of rusty nails. Hubby bought me the almost ridiculously huge Ball elite 21qt, pot. Its gorgeous, and all. But I think I would have liked something a tad smaller, I am only working with a 2 burner stove. Still think I’ll save my pennies for one more reasonable in size for smaller batches