
Recently, I got an email from a reader, asking that I tell her what she needed in terms of tools in order to get canning. I realized that though I’ve been writing this site for more than a year and a half, I’d never managed to outline my favorite canning equipment.
What you’ll notice is nearly everything pictured here is dual purpose. Most of pots, pans and other tools I use for canning are simply the tools of my kitchen that just happened to get pressed into service on a regular basis for food preservation.

First thing you need is a nice, roomy stock pot![]() . You want something that can hold at least 12 quarts and is tall enough to allow the jars to be fully submerged with some space left at the top for bubbling water. You also need a rack
. You want something that can hold at least 12 quarts and is tall enough to allow the jars to be fully submerged with some space left at the top for bubbling water. You also need a rack![]() to elevate the jars just slightly off the bottom of the pot. I like this old cake cooling rack that once belonged to my grandmother, but any low profile, round rack will do.
to elevate the jars just slightly off the bottom of the pot. I like this old cake cooling rack that once belonged to my grandmother, but any low profile, round rack will do.

One thing you learn quickly when you start to can is that you need to simmer your lids in a small pan of water prior to placing them on the jars. This ensures that you’ll get a good, solid seal. Any little pan will do.

Next you need a pot in which to cook your jams, chutneys, pickle-brines and more. I go back and forth between several sizes of enameled cast iron pots and…

This 8-quart All-Clad pot![]() . Honestly, this is my favorite pot at the moment (as you can tell by the fact that it was actually in use when it came time to take this photo. If you’re curious, it’s holding an apple-pumpkin butter that I’ll be posting about soon). It’s nice and wide and can be vigorously scrubbed if you happen to burn something in it. My husband would like it to be known that he bought this lovely pot for me after much obsessing on my part.
. Honestly, this is my favorite pot at the moment (as you can tell by the fact that it was actually in use when it came time to take this photo. If you’re curious, it’s holding an apple-pumpkin butter that I’ll be posting about soon). It’s nice and wide and can be vigorously scrubbed if you happen to burn something in it. My husband would like it to be known that he bought this lovely pot for me after much obsessing on my part.
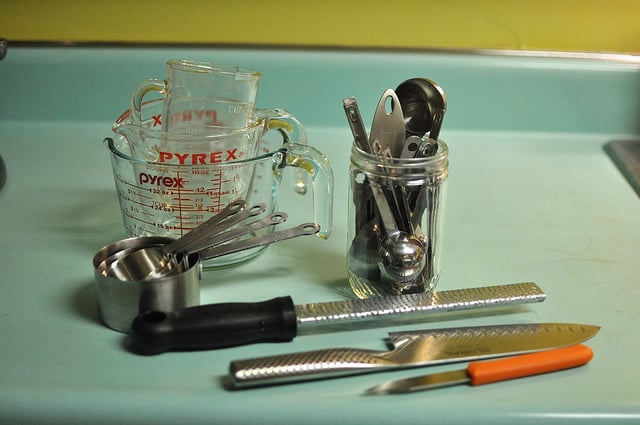
It’s always nice to have a generous assortment of measuring cups, measuring spoons, sharp knives and a microplane grater.
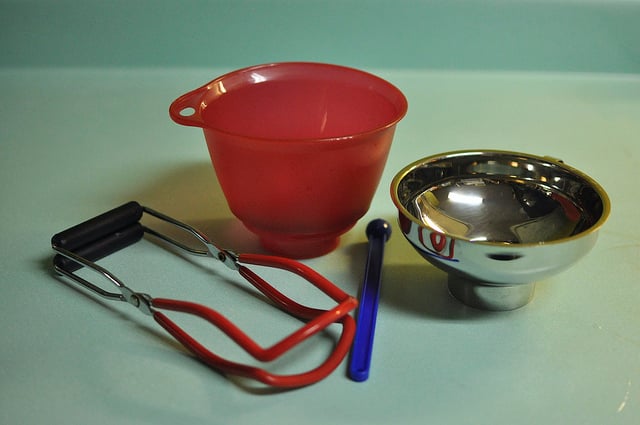
These are really the only specialty canning tools I think are necessary. Wide mouth funnels are really helpful (and once you have them in your kitchen, you’ll start to use them for other things. At least I do). A jar lifter is nice to help prevent burns and a magnetic lid wand is quite handy.

A little mesh skimmer is nice when you’re making a super-foamy jam. I got that one three years ago at a giant Asian grocery store in South Philadelphia for less than two bucks. It has proven its price many times over. I’m also a big fan of these newer, coated silicone spatulas. There’s nowhere that mildew or mold can develop because the coating covers the entire thing. Next to it is a very thin scraper that is absolutely brilliant when it comes to removing air bubbles from pickles and preserved fruit.

Jars. But you probably knew that already. They don’t have to be brand new, although the lids should be.

A stack of clean towels and a couple of hot pads keep things clean, dry and burn-free. All good things.
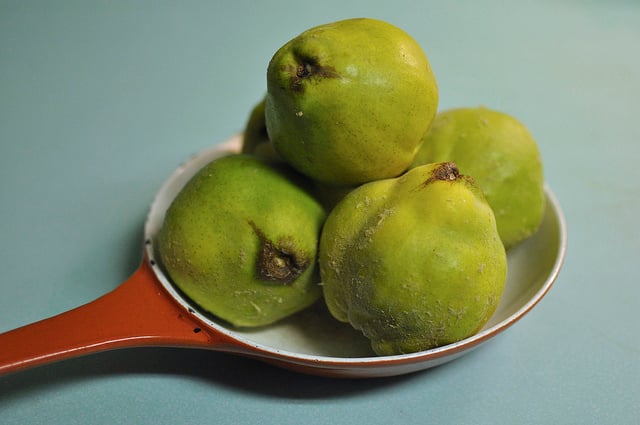
Finally, you need your main ingredient. I’ve been playing with quince quite a lot lately and will have two (that’s right, two!) recipes that use them in the coming days.

I’m new at canning and I know things change so I just have to ask if we simmer the lids as you advise here or do we not hear them at all?
It’s no longer necessary to simmer Ball lids. Some other brands still require it.
Marisa, do you have a favorite thermometer you like to use? I am in the market for a new one.
Thanks
I officially hate my Ball-branded enameled canning pot. It has a concave bottom that just doesn’t marry with my electric stove burner. Takes FOREVER to heat water. I much prefer my 6qt Calphalon stock pot. Perfect for half- and quarter-pints. Flat bottom and half the water.
Hi – I think the link to the rack is to the wrong one. I got mine today and it is very tint – only 6″ in diameter. Which looks much smaller than the one you have pictured.
Here’s the link from above: http://www.amazon.com/gp/product/B000I1ZUWO?ie=UTF8&tag=fooinjar-20&linkCode=as2&camp=1789&creative=390957&creativeASIN=B000I1ZUWO
Other than that, all my supplies arrived today and i’m excited to try my first project this weekend.
–
violet
So sorry! I will fix that right now.
A magnetic lid wand! Oooh, what a great idea. I so want one.
Hi! I recently bought the stockpot you linked above, and with a rack in place, the top of a ball quart jar is less than one inch from the top of the pot. My cake rack elevates the jars about 1″, so with a dish towel (I’ve read that this is acceptable?), there’s just over 1″ of space above the top of a quart jar. Is that going to be ok, or do you think that this product might have changed dimensions since you bought yours?
Thanks! (Currently feasting on fresh tomato jam on a poached egg!)
Cary, I must confess that I primarily use that pot for pints and half pints. However, when I do use it for quarts, I skip the rack and use the towel in order to have some water over the tops of the jar with some space for boiling. It’s an imperfect system, but one that works well enough. And I’m so glad you like the tomato jam!
Thanks for the always interesting posts from a real life practical canner!
My kitchen is tiny. And I lend tools.
Too often when I would find myself in the midst of a jammin’/cannin’ and unable to locate a specific piece of equipment. Now, I keep a big bin w all the bits necessary for a quick put up. A peeler, a micro planer, the gloves, the racks, the marking pen – even though I probably have the same items in the drawers.
Now when I want to jam or can, I just pull out the bin and begin. In the off season, the bin lives, out of the way under the stairs.
i’ve been afraid to purchase all the necessary equipment because I have one of those flat glass top electric stoves and I’ve heard those aren’t good for canning. Do you know if that’s true?
Thanx
Thanks for showing us the tools of your trade! As a visual person, I can appreciate a post like this.
Quince!! I have a box full from my mom in my kitchen now (i LOVE the smell of the fruit!). I hope you will share your recipe’s!
I also use a lot of cookie sheets (really jelly roll pan I guess-with the raised sides). I put my cutting boards in them to catch any extra juice that comes out when I chop tomatoes or other juicy fruit/veggies. And I line them with towels and put the newly processed jars on them when they come out of the water bath. That way I can move larger numbers of jars around quicker in my counter-space challenged kitchen.
I’ve canned over 100 jars of stuff this year, and it wasn’t until last week that it occurred to me that it’s okay if the jars touch each other, so long as they don’t touch the bottom. I’ve just always used my rack that’s divided into seven portions. Thrift store items rock! My big ol’ canning pot had rust spots, so I’m going to try our huge stockpot next time (with the steamer insert from our rice cooker on the bottom).
I finally found an inexpensive asparagus steamer and I have to say I love that recommendation! My chronic problem is starting things and then not finishing (ie canning) them, so I throw out a lot of things that are just waiting for pectin and a jar for no other reason than that I’m not in the mood to wait for my big pot to boil. I can only do one pint at a time, but the overall process is so much faster if I’m only canning a few.
Might I add as a resource myownlabels.com. Easy to use, not too expensive and excellent results. Sometimes “loving hands at home” only gets you so far. (just a fan, not a shill). Also, there are lots of jars you can get online with single piece lids. Again, nicer and more unusual. The openings are narrower, so you get a cheap plastic funnel at the hardware store and just saw it off at the right place (easy enough to figure out).
I broke down recently and ordered a maslin pan from the very wonderful Lee Valley catalog (LeeValley.com)because it’s built for making preserves. I have to tell you, it works wonderfully. The bottom is tri-ply and heavy, which is important on my big-BTU gas range, while the sides are sloped in such a way to contain what you’re boiling while you’re boiling it. No, it’s not cheap but pots of lesser quality can really scorch over high heat, and I was tired of scraping burnt sugar off the bottom of deep pots. Plus this pan is large enough to hold bigger batches of stuff. I can see it put to use for chili or soup or making stock after Thanksgiving.
Wow, your pot holds twelve quarts?! My water bath canner only holds seven! Not that I ever make much that I need more than that for, at least not yet! :o)
Stephanie, when I say 12 quarts, I mean that’s the liquid capacity of that pot. It really only holds seven pint jars comfortably.
So do you need to buy new lids for your new jars? My husband insists on buying as many lids as jars we are buying but I see that the jars COME with lids! Are we not supposed to use them?
You don’t have to buy new lids if you’re starting with brand new jars. The ones that the jars come with are perfectly fine. You only need to buy new lids if you’re working with previously used jars (or if the jars have been sitting around, unopened for a number of years).
Awesome! I just put together my wedding registry and have been reading everything I can get my hands on in regards to recommendations for kitchen things. I’m not so much going for a minimalist kitchen as one in which things are high-quality and do double duty without a lot of functional overlap. Your list confirms that I’ll be well set up for canning with this list. Thanks!
This is very helpful! Thanks you for posting.
Thank you so much for posting this! I will be teaching a bunch of friends how to can in a couple of weeks (amazing how many people don’t know how to do this) and this list reminded me of a couple of things I forgot!
I splurged last year and got myself a big copper French preserve pot from William-Sonoma. I love how beautiful and functional it is but you have to thoroughly polish it after each use. I use it mostly for big batches of preserves, the rest of the time it’s a giant fruit bowl! Usually I use my old trusty All Clad dutch oven or big cast iron pot to cook my fruit.
So enjoy reading your posts!
And a ladle! I’d like to add my 1 1/2 cents… Although the canning pot offered for sale on many websites is great – big, deep, etc., the color is really bad! I borrowed one from a friend (I usually use an aluminum pot which is light in color), and the jars disappeared against the dark color the second that I put them in the pot. Made it very difficult when I had to go fishing around to get out my little 2oz jars. Also, that rack that comes with it was SUPER annoying, as the handles that are supposed to stay up on the sides kept falling in. Although there is the distinct possibility that I was using it wrong…
Thanks as usual for your site. It has to be one of the most informative sites I’ve come across, and so relevant!!! Thanks!
I thought aluminum was a no-no for canning. Please correct me if I’m wrong, Marisa.
You don’t want to use a bare aluminum pot. Anodized aluminum is okay, because it’s non-reactive, but bare aluminum is not.
Lovely photos! I love that canning takes so few extra tools. You remind me that I keep meaning to find a plain old rack like yours to replace the canning rack I have – despite being designed for the job, it’s actually such an awkward size! wide-mouth pints don’t fit, and 4-oz jars slip and slide.
Oooh! Yes, my lovely little All Clad pots are constantly in heavy rotation. Kudos to your hubby! (It took a good few years to convince mine of the incredible capabilities of All Clad, but now he’s a convert, too.) I’m convinced that one truly amazing pot can replace scads of cheaper, less durable and less reliable vessels.
Love your blog xx
Cheers,
Bethany